Translate

Showing posts with label Cordite. Show all posts

Saturday, 5 October 2013

What is a Cordite Bucket?


 Having finished restoring our cordite bucket I am sure some people are saying. " Great, it looks good but what is it? ". We have sold a few over the years and as we will need to research it for its description in our forthcoming catalogue I thought this might be a good place to to expand on that.

    The first thing to know is it is not a bucket made of cordite but a bucket made to carry cordite. They are also referred to as Clarkson cases. From the Naval weapons website a definition  "British propellant charge container.  These were flash proof containers for bag charges (cartridges).  Charges were placed into these containers before they left the magazines.  The Clarkson's Cases then rode up the hoists to the guns where the charges were removed only when it was time to load them into the breech.  The Clarkson's Cases were reusable and were returned to the magazines for reloading."

 Which leads on to the first question. What is cordite? This entry from wikipedia is a good start.
" Cordite is a family of smokeless propellants developed and produced in the United Kingdom from 1889 to replace gunpowder as a military propellant. Like gunpowder, cordite is classified as a low explosive because of its slow burning rates and consequently low brisance. These produce a subsonic deflagration wave rather than the supersonic detonation wave produced by brisants, or high explosives. The hot gases produced by burning gunpowder or cordite generate sufficient pressure to propel a bullet or shell to its target, but not so quickly as to routinely destroy the barrel of the firearm, or gun. Cordite was used initially in the .303 British, Mark I and II, standard rifle cartridge between 1891 and 1915; shortages of cordite in World War I led to United States–developed smokeless powders being imported into the UK for use in rifle cartridges. Cordite was also used for large weapons, such as tank guns, artillery and naval guns. It has been used mainly for this purpose since the late 19th century by the UK and British Commonwealth countries." So the name comes from it being constructed in "cords". This photo shows what the cordite looks like.


 That probably helps explain the construction of the buckets. Its use dictates its construction. The body is made out of cork covered on the inside in canvas and the outside in leather. The handles and straps which are sewn are fixed to the body using copper rivets. So why these materials ? Basically they are "fit for purpose."
Cork is naturally fire resistant which is well suited to the safety angle of what is being contained and its light weight will be a bonus in making it easier to move around.
The leather is use to cover the cork as the hide can be wet , stretched and glued on meaning it will shrink on drying giving a tidy, tight finish. We have seen others which have painted canvas on the out side either have lost their leather and have been painted or possibly could be a different type.

 The canvas is purely used on the inside to seal the cork and on the outside to do this but also to provide a good surface to glue the leather on to.
Copper rivets and the plate supporting the handle on the inside provide a strong fitting and are used because the metal will not give a potentially lethal spark. The cordite cases would be used to transport the charge from the magazine to the guns.

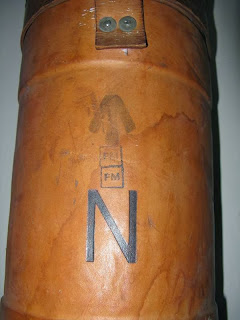
So what do the marking's mean. Lets look at this example:


 Firstly the "broad arrow" mark. This was used to show they were the property of the Board of Ordnance or Government department. This link gives some more history on the mark. If you see  2 broad arrow marks facing each other this is a sign that the case was decommissioned. N for Navy. B.H.&G. Ltd shows it was made by Barrow, Hepburn & Gale of Bermondsey, London. No 72  could be a size number and the I its mark. See diagram below. Possibly, all the cordite buckets were numbered and may even have corresponded with a specific gun?  Hopefully, some information will come to light and I can update this blog. Some will be stamped 'RCD' for Royal Chatham Dockyard. This book the Handbook of Ammunition from 1945 gives alot of answers and has this image showing cordite buckets.


The BL refers to breech loading guns. As you would expect no signs of a stenciled armorial which I am sure were added later when they were decommissioned and sold off as umbrella stands and waste paper bins. Some of the taller  ones we have seen reduced in height to do this. Some examples with stencils:


 The below example shows a cordite bucket that appears to have been reduced in height with  the base re-attached and an armorial added.


By Simon Clarke


References
Tony DiGiulian "Ammunition , Fuzes, Projectiles and Propellants" www.navweaps.com
BR932 Handbook on Ammunition 1945.
British Ordnance Collectors Network  http://www.bocn.co.uk
Christies
1stDibs.
www.campaignfurniture.com


Wednesday, 25 September 2013

Restoring a Cordite Bucket.

I often get the feeling that most of the  general public think that antique dealers spend most of their days sat behind a large pedestal desk, doing The Times crossword, drinking Earl Grey tea and getting up only occasionally to speak to a customer and relieve them of a Coutts cheque for the item they have paid full ticket price for. A similar comparison , which I also have experience of is the  publican seen as solely standing behind his bar, serving the occasional pint and enjoying a bit of banter with his jolly faced locals. Like most things life isn't like that.

     Probably, one of the most important jobs , apart from actually buying our stock, is getting it into  the kind of condition which we are proud to have in our shop. Buying stock either privately or at auction means that it is rarely in this condition. Even buying from other dealers generally means that some degree of work needs to be done as our philosophy has always been to get things back into as close to its original condition as possible and sometimes their idea of this is very different from ours.
     So this leads us on to restoration. I love seeking out wonderful things to buy but there can be few things that beat the satisfaction of a job well done in returning something back to its former glory.

   There is nothing like a challenge. In fact, before buying this has to be the first question. Can you do or get the restoration done to a standard you are happy with and at a price that still makes it economically a viable proposition?

    So on to today's task. We were offered this:


       The largest diameter (20 inches) cordite bucket we have ever seen. Interesting, for it size and also it's pre 1900 date inside the lid. Usually when this height they are taller ones that have been reduced in height to make into waste paper buckets. The clue to these can be they sometimes have an applied armourial transfer applied to the side. Some may have originally had transfers on but on most we have seen they look to have been added later. This one is its original size.

Made of  cork covered in leather on the outside with canvas on the inside. So, what are the problems here? Firstly, we have a lifting of the leather on the vertical seam and top.  Secondly, to make it worse the leather has shrunk meaning you will see the cork underneath if it is solely glued down.  Lastly, and further compounding the problems someone has attempted to sort out these problems already.  As any restorer will tell you what they hate more than anything is sorting out someone else's botched job. As dealers we would certainly prefer to buy things in untouched condition. So to anyone out there please remember unless you know what you are doing and how to do it you are better off leaving well alone. Things can easily go wrong and worse case scenario will be you will completely wreck what you are trying to fix. I'm not saying don't do it. Just get it right. It can be expensive  getting things restored. We know that. Sometimes we can't buy something just because we know it will cost too much to do. Sometimes we underestimate the cost and end up making a very short profit. That's how it goes. There can be hidden complications unnoticed when purchasing that don't get seen until you get the piece in the work shop or the problem can be more complicated than first realised. Anyway , if you have job like this and decide to take it on hopefully this will help.

 Where to start.? The previous attempt at restoration had involved using a type of PVA glue to stick down the lifting leather. This thankfully had been unsuccessful because too much of the glue had been applied. That is always a big mistake when gluing anything. So the I first job is to remove the glue. What I did before thinking about taking the above photo was to apply a leather feed to soften the leather and hopefully help loosen off the glue off the leather from the underside. The other reason of this being that the leather needs to be stretched back to cover where it originally was. The product I use is Fiebings 4 Way Care . This works really well as being a liquid it soaks right into the leather as opposed to the leather creams that barely touch the surface.
  Next I used a sharp scalpel to cut through the half dried glue. Having done this I could peel back the leather towards the handle. Once the leather feed had soaked in this made it easier to start peeling of the PVA glue and then apply the feed to the underside of the leather to the top. I should say I have always found it best to apply using a sponge as this allows quick application thus avoiding tide marks.
     The other problem encountered was that the lid had been squashed down leaving it concave. To fix this the cork would need to be soaked and  with weights pushing the top down it should then dry back in its original position. Once this was soaked it was left over the weekend. Now that this is done the next job is to glue the leather down. This was done using a contact adhesive after checking in an area near the handle. The contact glue I am using is  Thixofix ; having used it successfully before on similar task. Others may work equally well. I like this one because its gel type texture makes it so much easier to apply than " runny honey " types. Having applied the glue to both surfaces the leather is pushed down starting at the middle moving outwards to stretch towards the edge.
  Similarly, the vertical split was done in the same way. Here though it was soon realized that the leather would never stretch back far enough to cover its original position so a piece of leather of similar grain and colour was applied underneath. The colour was matched up better by applying a dark wax polish.


       The final thing to do is to polish and improve the somewhat lack lustre dull finish the leather had when the bucket was purchased. The Feiblings had done its job in feeding the leather now a wax polish is needed to give the leather a shinier finish. For this some Harrells khaki wax polish would be used. It is a good quality beeswax based polish that has enough turpentine in it that it will soak into the leather. Applying quickly to again avoid tide marks it is left overnight to really soak in before being buffed up using a soft cloth.


Our gamble has paid off and the bucket is looking as close to original as possible. Now on to move on to the research to see what else we can find out about our cordite bucket. Another job for when we are not to busy with our crossword.

By Simon Clarke.